Figuring out what makeup brushes to use for what can be extremely challenging and intimidating. But a good collection of brushes is a must-have for every makeup enthusiast.
Brushes not only make applying makeup quick and easy, but they also help the product go on smoothly and evenly, creating a flawless finish.
If you’re just getting into makeup, a good set of brushes makes the process much easier. So it’s important to know which ones to use in your makeup routine.
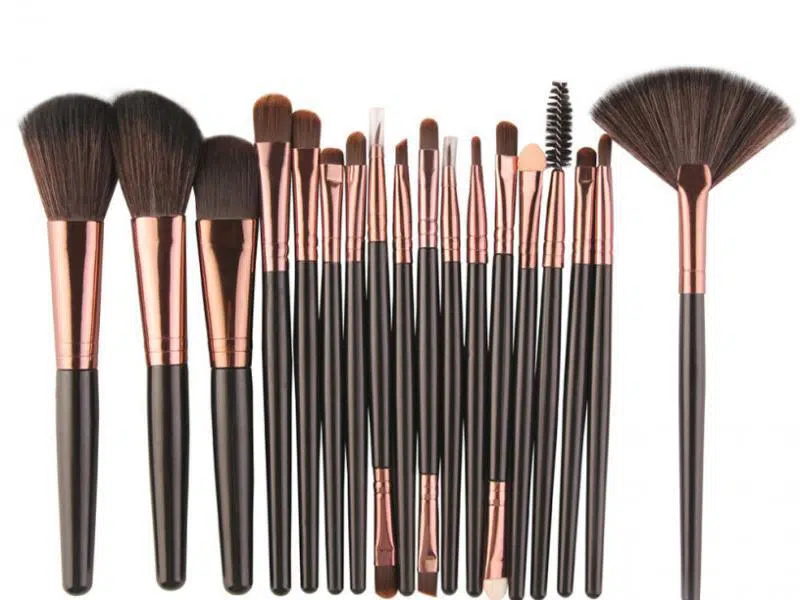
Here is a selection of important makeup brushes to help you know the basic makeup brushes you will need.
Different Types of Makeup Brushes:
- Foundation Brush
- Concealer Brush
- Powder Brush
- Blush Brush
- Mascara Brush/Wand
- Eye Shadow Brush
- Beauty Blender
- Bronzer Brush
- Contour Brush
- Highlight Brush
- Smudger Brush
- Lip Brush
Foundation Brush

Foundation Brush Use
It is used for applying foundation to your face. It helps to apply the base of the makeup, which is the foundation, uniformly on your skin.
Foundation Brush Guide
Your makeup routine should start off with an even base of the foundation. It can be difficult to apply a liquid foundation correctly without the proper brush.
There are many different types of foundation brushes: Tapered brushes, Stippling brushes, Buffing brushes, and Angled brushes…With so many options at your disposal, picking the right brush or tool can be a task. But an important one at that, because to get flawless-looking makeup, it’s necessary to get your base right. Here is a basic introduction.
- Tapered Brushes:

Tapered brushes are usually flat and low in density when compared to other brushes. Their look is distinctive because of the pointed, dense, precise, and multi-angle design. Tapered brushes come in handy when you are applying a base focused on filling in fine lines, and pores, and blurring other imperfections. They can fit the contours of your face perfectly, especially around the nose and dip of the chin.
- Stippling Brushes:

This type of foundation brush has a blunt, flat edge, with fibers of two distinctive lengths. The top layer helps pick up the product, and the denser, shorter layer helps push this product into your skin. Liquid and cream foundations that need seamless blending are a good match for this type of brush.
- Buffing Brushes:

Buffing brushes are used to apply powder foundations, they are equipped with really dense bristles to catch a lot of product and quickly cover up your whole face. They are also sometimes used in combination with other brushes, to buff out any harsh foundation lines left behind.
- Angled Brushes:

Angled foundation brushes are multipurpose brushes that can be used for both powder and liquid foundations. They are made with tightly packed soft fibers and are excellent at providing coverage to hard to reach places.
Concealer Brush

Concealer Brush Use
It is used to cover imperfections and brighten up dull areas on the face.
Concealer Brush Guide
For the most precise concealer application, you’ll want to use a small concealer brush. A concealer brush essentially looks like a very small version of a foundation brush. It’s shaped like a paintbrush but is slightly denser.
When using a concealer brush, apply a small amount of product to the desired area, and then lightly dab onto your skin until it blends in with your foundation. Do this using small amounts until you have covered the desired imperfections, whether they be acne, dark spots, under-eye circles, or something else.
Powder Brush

Powder Brush Use
Gently dusting loose powder products across your face.
Powder Brush Guide
The loose powder will help your makeup stay in place throughout the day and give you an even more flawless look. One of the many different types of makeup brushes, a powder brush is very large and fluffy, and it has a domed shape to evenly disperse the product over the face.
This is an exceptional beginner multi-tool, especially for use as a mineral foundation brush, because it’s simple to blend and work in your product.
And of all the types of makeup brushes, powder brushes are well-suited for adding color like blush when you want a more natural, less pigmented result.
Blusher Brush

Blush Brush Use
For the application of blush to get that fresh-faced, youthful rosiness.
Blush Brush Guide
A blush brush is similar to a powdered brush. Brushes for blush are generally a little stubbier, however, as they are covering a smaller area than a powder brush.
If you are using a powder blush, you’ll want to start on the apples of the cheeks and gently sweep the brush out towards your temples, concentrating most of the product on the apples.
If you’re using a cream blush, you may want to opt for a stippling motion for the most natural effect. When applying blush, it’s always best to start with a small amount and keep building and blending, as this will create the most natural look.
Mascara Brush/wand

Mascara Brush/Wand Use
Apply mascara to your upper and lower lash lines.
Mascara Brush/Wand Guide
Mascara wands are handy tools everyone should have. They help separate and define each lash. Before you apply your mascara with your spoolie, you can use an eyelash curler for an even more dramatic, full effect.
A good mascara wand features a spoolie shape, with small bristles sticking out from the wand in all directions. The bristles are designed to fit in between your lashes, acting almost as a hairbrush to push them in the right direction and apply the product. The bristles should be firm, as this makes the mascara application easier.
These wands can also be used to apply eyebrow gel, or just to brush the brow hairs in the same direction and neaten them up. They are also typically less durable than other makeup brushes, so you’ll want to buy them in packs or replace them frequently.
Eye Shadow brush

Eye Shadow Brush Use
This flat with a thin bristles makeup brush is used for applying eye shadows and eye shadow primers.
Eye Shadow Brush Guide
Your eyes speak a million words. Your eyes also draw a lot of attention and so you need to dress them up at all times. A good eye shadow makeup brush helps you achieve this. It can be either soft and subtle, or loud and dramatic.
After rubbing the brush over the product, pat or press the eyeshadow onto your eyelids, gently swirling the brush around the edges to blend them out. You can also mist your brush with a setting spray first to deepen the opacity of a powder pigment or to better pick up glittery eyeshadow.
Beauty Blender


Beauty Blender Use
Apply wet and dry foundation, blush, highlighter, and concealer.
Beauty Blender Guide
Beauty Blender and other similar makeup sponges are favored for a reason: they’re a great way to apply various of products. You can use it as a primer applicator for an even, solid base. You can even use it for applying sunscreen or topical creams. Of course, most commonly, beauty lovers use it to apply foundation and blend blush, bronzer, and highlighter.
The trick to using a sponge is to saturate it with running water, squeeze out the excess, then squeeze it a few more times in a clean towel or paper towel. This wetting process will not only prevent your sponge from soaking up all of your foundations (because it’s already damp with water) but will also help blend your makeup as smoothly as possible.
Bronzer Brush


Bronzer Brush Use
Applying bronzers to create glowy, sun-kissed skin.
Bronzer Brush Guide
Bronzer is one of the best ways to get a sunkissed, glowy look – without actually spending time in the sun, which can be harmful to your skin. A bronzer brush is similar in shape to a powder brush or a blush brush. However, it is very wide and even more fluffy than either of them. This is because bronzer needs to be dispersed very evenly on the skin in order to look natural.
When it comes to bronzer, the way you use the brush is almost more important than the brush itself. For correctly use the bronzer, loosely sweep the brush in a “3” pattern, starting from your forehead, cutting across your cheekbones, then moving back out and down to your jawline. This technique creates a natural look because it places bronzer on the points of the face where the sun would naturally hit.
Contour Brush

Contour Brush Use
To achieve angular, defined cheekbones and the structure of face.
Contour Brush Guide
Contouring is a great way to give your face a naturally sculpted look, but you need a great brush in order to do it. There are many different types of makeup brushes that can be used for contouring. The bristles on some are cut sharp and straight across, while others may take on more of an “S” shape to hug the shape of your cheekbones.
The slanted contour brush is the most versatile and makes it easier to contour for your face shape by blending your contour powder cleanly and precisely beneath your cheekbones, jawline, and forehead. Use a brush with blunt bristles and a sharp edge for a sharper sculpt or use one with a softer slanted shape for a subtle shade.
To use, apply the contour to the hollows of your cheeks, and then use a stippling motion to work it into the skin. As the product starts to blend, switch to a circular motion, being careful to keep the product in the appropriate location.
Highlight Brush

Highlight Brush Use
Apply highlight to your cheekbones for an extra glowy look.
Highlight Brush Guide
Highlight brushes look very different from most other types of makeup brushes. They are shaped like a fan and have very thin bristles. This fan shape allows you to apply the glowy product evenly to the tops of your cheekbones – without looking like a disco ball. The highlighter is very trendy at the moment, so this is a great brush to add to your collection.
To use, gently pick up a small amount of product with the brush and sweep it back and forth over the tops of your cheekbones, moving side to side. You can also apply highlight to the tip of your nose and your cupid’s bow for an extra glowy look.
Smudger Brush

Smudger Brush Use
The Eye Smudger Brush is great for applying color to add definition in the eye socket area, or for creating a more smoky eye look.
Smudger Brush Guide
The smudger brush is for those who love brush eyeliners. This brush is very commonly found in most makeup kits. The soft, foam end of the brush allows you to smudge out the dark eyeliner. This gives a smoky look and adds a super-stylish touch to your overall look.
Apply your kohl or pencil liner, then use the brush to blend the edge of the eyeliner outward. Then, use the same brush to go back over the eyeliner with a similar eyeshadow shade. This will not only set the color underneath but also layer textures to create depth so your smokey eye doesn’t look one-dimensional.
Lip Brush

Lip Brush Use
To define the lips and help you apply your lipstick much easier.
Lip Brush Guide
A lip brush is a very handy makeup tool. A lip brush is very small and thin, with a layer of sleek bristles that act like a paintbrush. You might think lip brushes are only for professional makeup artists, but if you line your lips, you’ll find a lip brush to be really helpful for diffusing harsh lines from your lip liner and blending it into your lipstick.
The brush is highly useful for those who like some drama on their lips and enjoy a noticeable lip line beyond the lip color.
Trace your lips with lip liner, then run the bristles of the lip brush along the inside edge of the line to soften it. If you’re using your own products, you can swipe the brush right on the lipstick to pick up the product for a more precise application.
That’s all about the makeup brushes, have you learned the difference and uses of them?